How to Restore Windows 11 System to Previous Time Point
This article explains three ways to restore Windows 11 system to previous time point easily and safely. When your Windows 11 runs slowly, cannot boot normally, or you lose password to your Windows 11 admin account, this tutorial maybe helpful to you. System restore will bring you to the time point when Windows ran smoothly, boot normally or you remember your admin password.
To restore Windows 11 to previous time point, please first make sure that you have created a system restore point previously. If you have done that, use the following procedures to perform system restore:
Solution 1: Restore Your Windows 11 When You Can Logon.
Solution 2: Restore Windows 11 to Previous Point When The System Cannot Start Normally.
If the restore does not resolve the issue or if the issue becomes worse, you can also undo a System Restore and it will put the files and programs back to the way they were before you used System Restore.
In Additional: Undo System Restore in Windows 11.
Solution 1: Restore Your Windows 11 When You Can Logon.
When your Windows 11 computer runs slowly or doesn’t work correctly, you can restore it to a previous point in time when it was working smoothly and correctly. You can accomplish this task from Windows settings.
Note: If you have changed your admin account password recently, please create a password reset disk for the admin account first. In case that you cannot sign-in it after system restore, you can use this disk to reset the admin password easily.To perform System Restore on a working Windows 11 computer, complete the following steps:
Step 1: Save any open files and close all open programs. Open Windows start menu, type “windows restore” in the search box and then select “Recovery” from search results.

Step 2: Under “Advanced recovery tools”, select “Open System Restore”.

Step 3: System Restore wizard appears, click “Next” to continue.

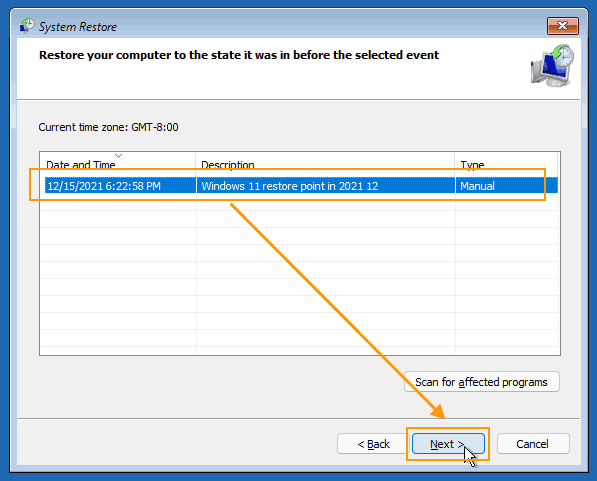
Step 4: Select a restore point which you created before and then click “Next”. This means that you will restore the computer to the state it was in before the selected event. Before going next, you can first click “Scan for affected program” to see how many programs will be affected after system restore. So you can fix that after the system restore completes.

Step 5: On the confirmation window, make sure that you remember the Windows password in the point or you have created a password reset disk. Then click “Finish”.

Step 6: When a warning message pops up, select "Yes" to confirm system restore. Do not interrupt System Restore when it starts. This can corrupt your hard drive and create more problems.

Step 6: System restore starts and it will be completed in several minutes or more which depends on how large your hard disk is.

Step 7: System Restore completed successfully. The system has been restored to the point your selected in step 4. Now click “Restart”.

Step 8: After restarting, you can sign in your user account with the password you used at that point. If it doesn’t work, use your password reset disk to reset it.

Step 9: Now update or re-install some of your programs which were affected in the System Restore.

Solution 2: Restore Windows 11 to Previous Point When The System Cannot Start Normally.
If your Windows 11 cannot start normally after sign-in but can boot and show you the sign-in screen, use this solution to restore your computer to previous point.
Step 1: Turn on the computer. On the sign-in screen, hold down the “Shift” key and click “Restart”.

Step 2: When “Choose an option” screen appears, select “Troubleshoot”.

Step 3: On the Troubleshoot screen, click Advanced Options.

Step 4: Under the Advanced options, click System Restore.

Step 5: System Restore window appears, click “Next” to continue.

Step 6: Select the Restore Point which you want to use, and then click “Next”.
Step 7: Click your system drive and then click “Finish”.

Step 8: Click “Yes” in the warning message to start System Restore. Don’t interrupt the process once the restore starts.

Step 9: System Restore starts and returns the computer configuration to the restore point you chose.
Step 10: When it completed successfully, click “Restart”.

Step 11: After that, login Windows with the password you used in that time point.

Step 12: Now update or re-install some of your programs which were affected in the System Restore.

Solution 3: Restore Windows 11 to Previous Point If Your Computer Cannot Boot Normally or You Forgot Windows Password.
If you have forgotten your Windows 11 admin password, you can restore the system to a previous point when you remember the password you used at that time. If it works, you only need to update the apps which are affected in System Restore or reinstall some apps which you installed after the time of the restore point. Let’s see how to do.
Step 1: Power on your computer. When the Windows brand icon appears, shut down the computer immediately. Do this for three times. In the third time you turn on the computer, it will automatically boot into “Automatic Repair” mode.

Step 2: To continue, click “Advanced options”.

Step 3: Choose an option screen appears, click “Troubleshoot”.

Step 4: Select “Advanced options”.

Step 5: Select “System Restore”.

Step 6: System Restore wizard pops up, click “Next”.

Step 7: Select a restore point you want to use and then click “Next”.

Step 8: Select your system hard disk and then click “Finish”.

Step 9: Warning message pops up, click “Yes”.

Step 10: System Restore starts and will be completed in several minutes or more.

Step 11: When it successfully completes, click “Restart”.

Step 12: Sign in your admin account with the password you used at that time point.

Step 13: Now update or re-install some of your programs which were affected in the System Restore.

Tip: If you forgot your Windows 11 password and didn’t create any system restore point, you can use Windows Password Rescuer to reset your forgotten password easily without affecting any of your files and apps.
In Additional: Undo System Restore in Windows 11.
To undo a System Restore and return all things back to the way they were, complete the following steps.
Step 1: Open “Start” menu and type “create a restore point” in the search box. From the search results, select “Create a restore point”.
Step 2: System Properties opens with the System Protection tab selected.
Step 3: On the System Protection tab, click System Restore.
Step 4: System Restore window appears. Select Undo System Restore, and then click “Next”.
Step 5: Confirm that the date and time are correct, and then click “Finish”.
Step 6: When a warning message pops up, click “Yes”.
Step 7: System Restore starts and it will be completed in minutes or more. When it successfully completes, restart the computer and then all things have been returned to the way they were before you used system restore.

Price: $ 17.95