Create Domain User Windows Server 2022 & Add It to Admin Group
If you are using the latest version of Commerce Windows Server 2022, you may need to configure Active Directory on your server computer. An administrator user is created by default as domain admin controller. Usually, adding more admin user accounts is also needed when you want to give other users access to your computer.
SCreating domain user account in Windows server 2022 is easy if you have ever done this on any other Windows system. The steps are similar. This topic provides two instructions for creating domain user account and then adding it to admin group easily. If you have lost your domain administrator password and need to regain access to your server computer, a special method list at last will help you easily resolve the problem.
Section One: How to Add/Create Domain User Account on Windows Server 2022.
Trip 1: How to Add Domain User Account by Using CMD.
Trip 2: How to Create Domain User Account on Server Manager (Active Directory).
Section Two: How to Add Domain User Account to Admin Group.
Section Three: Add Domain Admin Account by Using USB Flash Drive.(This also works when you lose access to your Windows serve 2022.or lose your admin password.)
Section One: How to Add/Create Domain User Account on Windows Server 2022.
Trip 1: How to Add Domain User Account by Using CMD.
If you want to add or create new domain user account on Windows server 2022, you can use CMD to easily accomplish this task. It is easy and fast.
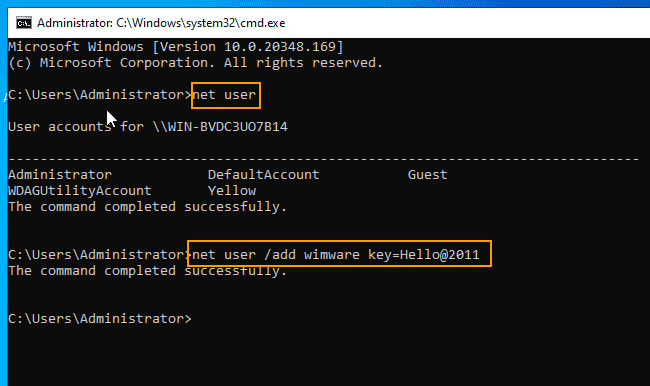
Step 1: Sign in your domain administrator on Windows server 2022 and run CMD. In the search box, type CMD and then right-click CMD, then choose “run as administrator”. You also can press Win+R keys at the same time to open the Run box. Type “cmd” and then press “Enter” key.

Step 2: Command box is open. Type “net user” and then press Enter key. All domain user accounts on this computer will be displayed. To add or create new user account, type “net user /add [new user] key=[password]” and then press Enter key. Command completed successfully. A new domain user account has been created successfully. You can log on it in next sign in.
Trip 2: How to Create Domain User Account on Server Manager (Active Directory).
This is a common but fast and secure way to create domain user account in Windows server 2022. The steps are similar to that in Windows server 2019/2016. With help of Windows Server Manager, people can easily manage all users and computers available under the domain controller. Here I will show you the procedure of creating domain user account from Server Manager.
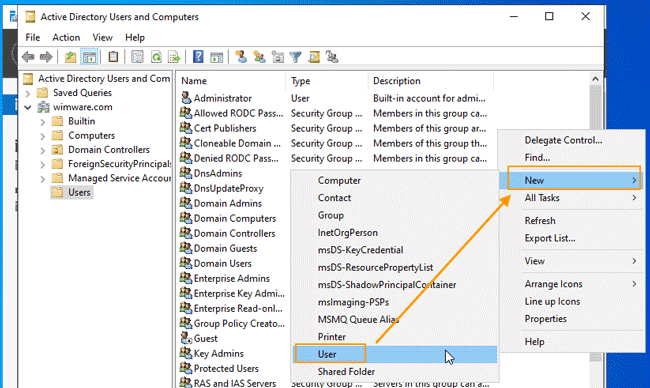
Step 1: Open Server Manager (Active Directory). Select “Tools” from menu bar. Under “Tools”, select “Active Directory Users and Computers”.

Step 2: In the right of opened window, right-click the blank field and then select “User” – “New”.
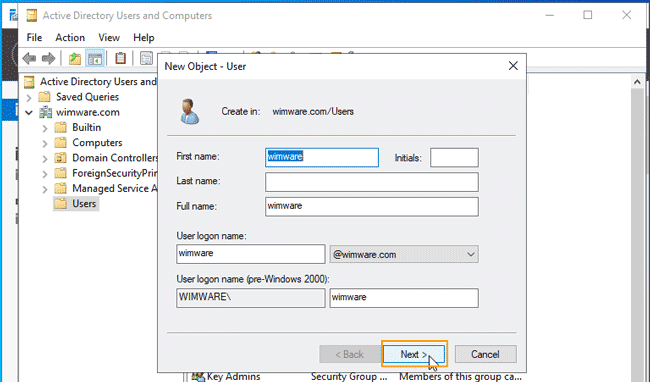
Step 3: New user dialog appears. Type a new user logon name and then click “Next”.
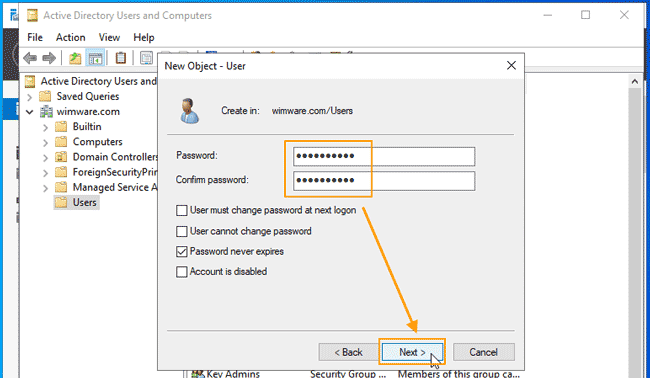
Step 4: Enter a new password twice. Select “Password never expires” and then click “Next”.
Step 5: Information of the new domain user account is shown to you. Check it again and then click “Finish”.

Step 6: Now you can see the new domain user is shown in user list. In next sign in, you can log on the account with your password.

Section Two: How to Add Domain User Account to Admin Group.
After creating new domain user account, you may need to add administrative privileges to your account. In this section, I will show you how to easily add a domain user account to admin group. Then you can use this account to log into your server computer as administrator and manage computers in the Active Directory.
Step 1: Log on your administrator account in Windows server 2022. In the search box, type “control panel” and then select the app from the search result.

Step 2: Control Panel is open. Select “User Accounts”.

Step 3: Under “User Accounts”, select “Give other users access to this computer”.

Step 4: User Accounts dialog is open. Click “Add” button.

Step 5: Select “Administrator” and the click “Next”.

Step 6: A domain user account type will be changed to administrator. It will be able to sign in to your server computer and access system resources. Now click “Finish”.

Step 7: Now you could see the new domain user account has been added to the domain admin group.

Section Three: Add Domain Admin Account by Using USB Flash Drive.
If you have lost access to your domain administrator account, expect resetting the forgotten password of Windows server 2022 admin account, you also can create a new domain admin account via a USB FLASH DRIVE. In this section, I will show you an easy way to add new domain admin account to Windows server 2022 when locked out of server computer.
To accomplish this task, you need help of a USB flash drive and a powerful Windows password recovery tool, Windows Password Rescuer Advanced. Here is how:
Step 1: Create a boot disk with Windows Password Rescuer.
1. Use an available computer to download and install Windows Password Rescuer Advanced. Then launch it. Plug a blank USB flash drive into the computer and then select “USB Device” from the software interface.

2. Pull down the drive list and select the USB drive. Then click “Begin Burning” button. When a confirm message pops up, click “Yes”.

3. Wait the software creates a boot USB disk for you. When burning process successfully completed, unplug the USB flash drive.

Step 2: Use the USB disk to create domain admin account on your Windows server 2022 computer.
1. Plug the USB boot disk to your server computer. Then reboot the computer from USB. (Learn how to boot a computer from USB.)

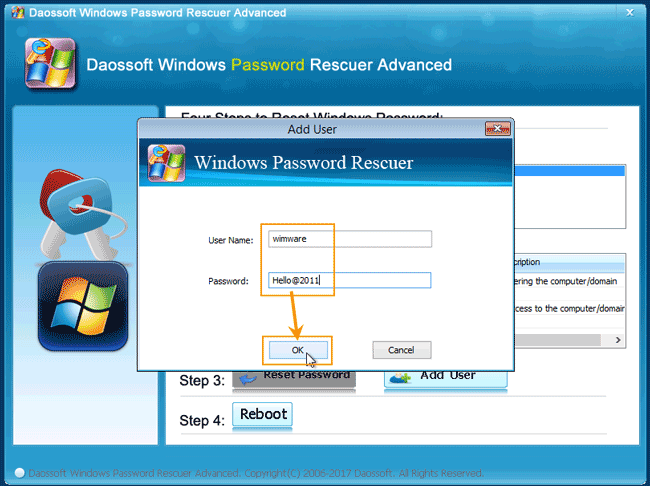
2. When the server computer successfully boots from USB, Windows Password Rescuer will run automatically and show you a friendly interface. Now select your Windows server 2022 from list and then click “Add User” button.

3. Add user dialog appears, type in a new user name and password. Then click “OK”.
4. A new domain user account with admin privileges will be shown in user list. Reboot the computer and then you are able to sign in this account.

5. Now click “Reboot”. When a confirm message pops up, unplug the USB flash drive and then click “Yes”.

6. Wait the computer reboots normally and then you can sign in the new admin account and have access to your system resources.

Price: $ 45.95